Varnish cache is a super caching application which will cache your website pages and images in RAM and deliver it directly to the visitors, thereby speeding up the web site.The major drawback of Varnish Cache is that you will not be able to run secure pages with Varnish Cache
This is because Varnish Cache is not an SSL terminator. It means that, Varnish Cache does not have the capability of decrypting the encrypted traffic. So we need to place a SSL termination app in front of varnish, and convert the https traffic to htttp and feed it to Varnish.
One easy solution when using nginx web server is to use http2 for SSL connections. Http2 is a faster way for rendering the site content, but not as fast if you had varnish.
Last day I have configured a WordPress installation using nginx, and varnish. but the client needed SSL too, as he believes it is so important for SEO – which is.
So my solution was to set up word press with out SSL initially, as per my previous post here , with no caching app inside the wordpress.
And then configured nginx as a reverse proxy to handle SSL. It is basically a reverse proxy which redirects all https traffic to http. Nginx is fast and works very well in this situation.
Nginx Configuration
server {
       listen 443 ssl;
       ssl_certificate /home/websites/nginx/ssl/websitename.tld.crt;
       ssl_certificate_key /home/websites/nginx/ssl/websitename.tld.key;
       server_name websitename.tld www.websitename.tld ;

location / {
       proxy_pass http://127.0.0.1 ;
       proxy_set_header X-Real-IP $remote_addr;
       proxy_set_header X-Forwarded-For $proxy_add_x_forwarded_for;
       proxy_set_header X-Forwarded-Proto https;
       proxy_set_header X-Forwarded-Port 443;
       proxy_set_header Host $host;
           }

      }
This means that http://websitename.tld and https://websitename.tld will work. To get the website redirect all traffic to https, I enabled cloud flare with a page rule to enable SSL for all traffic.
CloudFlare Configuration
SSL configuration :- Since we have SSL enabled, we do not have an issue in enabling Full SSL for the site.
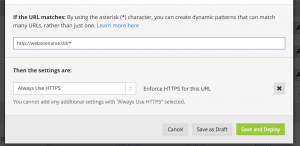
Then I created a page rule, which will redirect all traffic from http://websitename.tld to https://websitename.tld.
Now clear your varnish cache and the cloudflare cache, and bingo! you’re ready to go!


